|
DDA II was mainly focused in 3D Modeling, this made it much harder to adjust from last year, but wasn't just being thrown into the deep end. It was felt a lot in the beginning, and especially the second quarter, but has been overall pretty cool. Certain projects have put a damper on some of the activities, and have made this year a particular black mark, but most of them are on our faults, so this year has been what a class has been intended to be, a learning experience. The topics we discussed were important and were related to making certain shapes much more realistically shaped, rendering those shapes as best as they can, and making animations out of those shapes, all making pieces worth actually sharing, especially making the train station look as pretty as possible. Seeing growth artistically as pretty fun too, which is discussed more in another blog post, but since it's the year in review it counts to be mentioned. What also grew in this year is mainly how assignments are set up. This may seem small, but it saves a lot of time and effort for students and teachers. This starts with the Digital Asset Management Folder, the ultimate in digital management. Keeping everything in a folder, which is stored in a clearly organized folder makes it much easier to find and work on projects. This also helps in knowing where projects we will use again will be, like the train station or robot project. Grades have also been graded based on three categories, making mental organization of objectives in a project much more easy to remember, which would naturally make grades easier to understand as well. So, in all, the year was pretty cool, but had much more bumpy roads compared to last year. 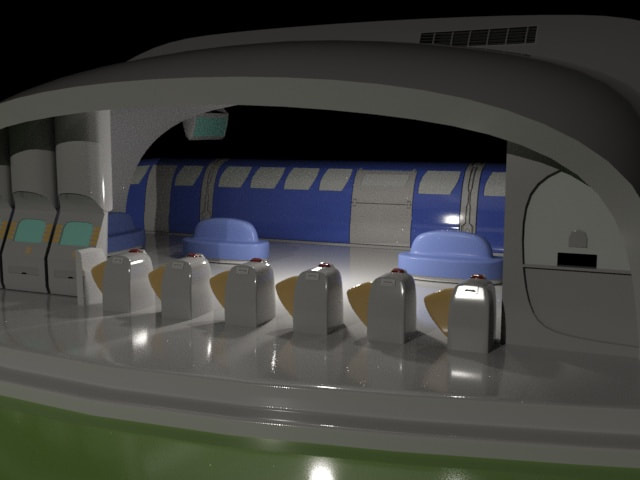 The Renders On The Train Station Was One Of My Favorites Of The Year
1 Comment
Animation and cameras go hand in hand, since both are needed to make any render of a moving subject be convincing. Since we already used cameras, we have been learning more about animation, not just the auto key from last year. We play around with the curves that an object makes when it moves, this is most applicable to a ball bouncing, the first object we really animated. We then had to apply our bounces to multiple objects. Animating a bounce requires the Curve Editor, a useful graph that shows the XYZ movements for an object. Cutting out certain frames can make a bounce less rail-like, and more natural, this is the base for our bounce.
Another technique we used is the rotation, a small change, but one that makes the ball look less like it's bouncing on a pathway, and more of a ball bouncing. Changing the rotation is only changing the axis of the ball at key frames, self explanatory, but it's the little touch that makes the animation much more convincing. The last piece is the Squash and Stretch, which is not as simple as either of the last two. It requires the use of the Stretch modifier, but can change at key frames in specific ways, with specific modifiers. If you want a ball to start and stop, then do it again differently, it will keep stretching in that way. But, in a perfect world, it helps in making the ball's bounces much more real. It may make the ball seem more cartoon-ish, but in a way that is feasible and appealing. So, in the end, what did we take from doing a bunch of activities based around a topic then doing a quiz afterwards?
Sources: “Animation.” Autodesk Support & Learning, knowledge.autodesk.com/support/3ds-max/learn-explore/caas/CloudHelp/cloudhelp/2017/ENU/3DSMax/files/GUID-FC0BE460-9BA8-4221-AEA6-ACB6ECA4AE9B-htm.html. Lax, Melissa. “3ds Max Animation Techniques | Tutorial Series | AREA by Autodesk.” Area by Autodesk, 20 Sept. 2016, area.autodesk.com/tutorials/series/3ds-max-animation-techniques-series/. I have already gone over lights in a previous post, but the fact we're using cameras which are drastically changed by lights helps to put a new purpose to certain lights. A new example would be directional lighting, which can either be free or directional. Free lights are good for any scenario that needs a light, but directional will work much better for certain shots. Cameras that rely on good lighting will need a directional light if it needs to arc around the subject. The Arnold Render is dependent on certain lights, particularly the Arnold Lights. They function like regular lights, but is one light that is set to be different lights, like Spot and Quad. Directing Cameras is really useful with Arnold Lights, giving scenes different emotions and feelings. There are also different camera settings that affect light, which relate more to the lighting than the camera innately. Having exposure change a scene's light input, while things like aperture change the brightness, also changing a scene completely. With lights and cameras having to work in tandem, understanding both is important in rendering convincing and realistic scenes.  Train Station made in an Arnold Renderer
It's the last quarter of the year, and we have had units that are a bit compressed. But, what we learned in the first couple weeks are pretty important, Cameras are the basis of having good renders and animations. You can't just render from the perspective of the view-port, Cameras help to have a view that can be more realistic or well composed than a simple perspective. Cameras also have setting that only physical cameras have, like Depth of Field and specific camera movements. Auto Framing with the camera is good in that it can use certain angles to get a good frame. It can also be set on different frames, which is useful for spacing out frames for different camera speeds. Changing the speed can be good for having quick, snappy camera movements, or slow panning shots for a model. This is useful for any camera movement in a video render. Combined with lighting, which is linked to cameras by the fact a physical camera needs proper lighting or it makes a blown out mess. Arnold lights work especially well, since Depth of Field only works with it, and how it can properly light a scene, combined with good camera movements. Cameras are useful overall for any render, to make it look more uniform and professional.   Cameras are useful for affecting the Depth of Field to put focus on a certain subject
This week back, we learned about a new unit that's a little different from previous units. The Lighting unit focuses on how a scene is affected by light, including shadows. The main part of learning about lights is realizing the types of lights used. There are spotlights, the lights that focus on shining in a cone, freely or in a specific direction, while directional lights are a straight beam to a point from another point. The other lights focus on lighting all multiple parts of a scene, Omni being the most straight-forward, by brightening all objects in a scene, akin to a light bulb. Skylight lights up an entire area, more accurately to the sun than an Omni. But Sun Positioner is for very, very specific positions of the sun. Each light has it's purpose, but the more useful ones are related to making a basic sunlight, like Omni or skylight. In some cases, a spot can make up for sunlight, but skylight just works for the most part. But, for clarity in a scene, using spots is really important. Setting up spots so they light a scene well is one of the many important roles of lighting in 3D modeling, second to making a convincing scene. We had to demonstrate this in class by little sample projects, which are ungraded but still required, which may seem like a weird idea, but it relies on primarily project grades. There are only three, and could mess up quickly, but are pretty easy for the most part. What Did We Learn This Week?
“The Standard 3-Point Lighting Technique.” Three Point Lighting, www.mediacollege.com/lighting/three-point/. “Skylight.” Autodesk Support & Learning, knowledge.autodesk.com/support/3ds-max/getting-started/caas/CloudHelp/cloudhelp/2019/ENU/3DSMax-Lighting-Shading/files/GUID-772D28D6-41C3-4C80-80AD-3774726E208F-htm.html. 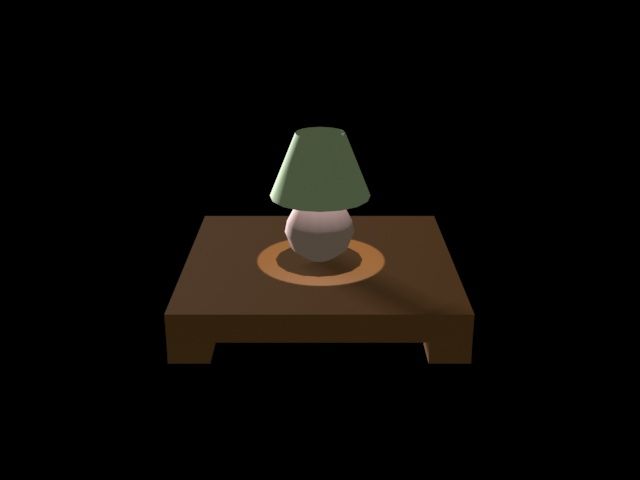 This Image Uses Three Lights, A Spot For The Directions, One in the Lamp, And A Subtle Omni To Tie It All Together
At the end of third quarter, we've learned a technique that, arguably, tops most of the previous modeling techniques. Previous techniques, like Surface and Compound Modeling, are still very important for the actual model, but UVWs with material editing help to elevate the model. Using a combination of each will easily make renders, which we have been playing around with this unit, more realistic. But, in the whole third quarter, my favorite is UVW modeling, which is strange because people usually struggle with UVWs. I talk about UVW mapping a lot, not just because it's the end of the quarter, but due to how explainable it is, it's unwrapped, then wrapped around the model. Peeling really helps in making the 2D texture, and putting it onto a 3D model. This unit has been the more understandable, in terms of actual information, and execution. We also learned about the Material Editor, a very important tool, which we even learned last year. The material editor is what we put on top of the UVW, which is a Bitmap, and to make it much more real, if we try to render on top of another image, not making an eyesore of a render on top of a Photograph. It was, in retrospect, a simple unit that felt a lot more easier to grasp, probably because it came back to Photoshop, more Photoshop related projects are always accepted in my book, but applying them to a 3D model properly, instead of an odd texture that just makes you actually WANT to learn a new technique, is much more fun. So, hopefully this reflects in grades, and next unit, Lights and Cameras, will be just as easy to grasp, and useful as third quarter's material.  A very Anticlimactic last project image, but it's the thought that counts, right?
This week is the last week of the quarter, and is mainly comprised of more UVW projects, which we have learned to use a bit better, so much so that a new blog post can be made about it. But, many of the techniques used to make a texture is mainly done in textures, made in Photoshop, and how they wrap around the texture to add a new dimension, which is much more easier to due since a map can be made to correctly map certain aspects to the right parts. But, some parts can't be easily mapped, like the sides of textures not picked up on a 2D map. The best thing to do is to peel a texture, which needs a bit more of the texture to fit new sides for textures, which makes more sense if you've seen it. Some textures don't need more of the texture to do so, but there are times to physically make a texture in order to get a convincing texture, Very important in a 3D texture,  Since I only talked about how UVW activities were going for regular shapes, I have to talk about how wrapping and unwrapping a UVW is almost a different type of modeling. The most visible difference is how the UVW is mapped differently, not just images, but a single image which the wrap takes from, putting each side on a more complex shape, which has to be turned into a poly first. This process is also in a separate window, which seems scary at first, but is actually easier to use than it being in the little tool section. So, our first real project that uses this is a gas can, which is not just a box, but a full model, with a texture on it. The shape has all the textures, except for a few corners that don't line up EXACTLY with the texture, a set-back for this process is how layered it is, and certain spots not being aligned exactly. Which, makes this another process that can be applied to a lot more shapes, but is such a tedious, step by step process that you could easily mess up once, and have to restart. Which, is what most modeling is, but techniques like these make it much more interesting, to say the least.
Ever since our required folders have been made, it has been easier to adjust to the new rubric, since they go hand in hand. Which I have talked about in the last Blog Post, but it didn't get the spotlight I intended for it, since the blog post was primarily about UVW Mapping. It's is made even easier by the fact we can have a default project set up in a folder, for each project. Which just means we can make folders that automatically sort all types of files into each type. This makes organization much, much more easier since files can easily go to their assigned places, where it automatically goes if it's used for the file, really useful. This is used for each file, so everything is in a folder, and whatever we need is easily accessed and not just in some public folder in the DAM which has multiple folders for each project, some of which have the same name. So, this helps a lot in working with new projects.
This Week, we learned of UVW maps, which includes some the textures, maps, and shaders from the week before. The main difference is that UVWs involve unwrapping the shape, texturing it, and putting it back together. Making the regular box is fine, and does make realistic shapes, but wrapping makes it even more real, but much more step by step and convoluted. The first project we made was with just the textures, and was pretty easy. The main difference from every project up to this point is that we have a standardized rubric now, with the stages of pre-production, production, and post-production, for every project from now on. Which, makes it much more easier to know what a project's asking for, since it's spread out between three stages, having each in an order is good for organization. Speaking of organization, we are also required to have a Digital Asset Management folder, which puts each file we use into other folders, organized into various types of categories. It can be organized into renders, texture files, and planning materials, which is very, very useful for a project that requires renders, textures, and composites turned in at separate times. But, having to take pictures of each category we make for each file we submit is a little tedious, and can easily be misunderstood, as a picture of the file folders, and not just the one it's in, is required. This folder is also what prevented much a confused older folder, which had everthing in it, no folders to keep anything, except the texturing project that we never speak of, ever. But, it's what made the projects much easier, and makes a person feel very responsible. So, what did we learn this week?
Stum, Michael. “What Exactly Is UV and UVW Mapping?” Game Development Stack Exchange, gamedev.stackexchange.com/questions/6911/what-exactly-is-uv-and-uvw-mapping. “UVW Map Modifier.” Autodesk Support & Learning, knowledge.autodesk.com/support/3ds-max/learn-explore/caas/CloudHelp/cloudhelp/2017/ENU/3DSMax/files/GUID-78327298-4741-470C-848D-4C3618B18FCA-htm.html.  Simple Box Made With Bitmaps
|
JamesHe aspires to be a game designer, let's just hope he gets there. He also happens to goes to DSA. Categories
All
Archives
August 2021

|
